iOS에서 Push Notification을 개발하거나 테스트하려면 개발자계정이 있어야 합니다. 요즘 push기능이 없는 앱은 거의 없습니다. 개발자계정에 어떤 종류가 있는지도 다룰 테지만 먼저 정리해야 할 것이 Push Notification이기 때문에 이것부터 정리하도록 하겠습니다.
[목차]
- Push Notification 개발하기 전에 해야하는 것
- Push Notification 사용법 - 서버
- Push Notification 사용법 - 클라이언트
1. Push Notification 개발하기 전에 해야하는 것
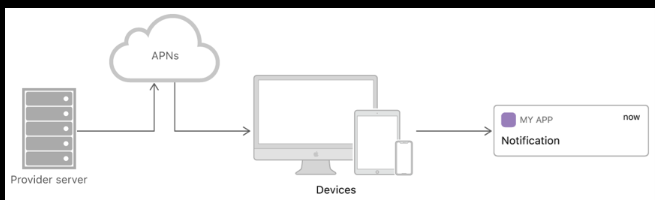
푸시는 그저 클라이언트단에서만 이루어지는 것이 아닙니다. Push notification을 하기 위해서는 언제 어디로 푸시를 날려줄지 정해주는 Provider server(server) 와 클라이언트 앱과 연동되어 있는 애플 자체 푸시서버인 APNs와 클라이언트 기기가 필요합니다.
푸시가 전송되는 과정은 클라이언트 메시지 요청 -> 로컬서버(Provider server) -> APNs -> 다른 클라이언트 기기로 이루어집니다.
이 과정을 하기 위해서는 첫째로 APNs(Apple Push Notification Service)에 나의 앱이라는 것을 인식시키기 위한 고유의 디바이스 토큰을 등록해야 합니다.
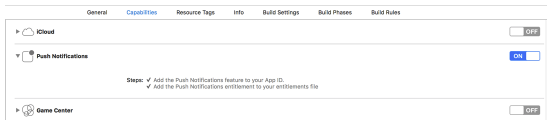
우선 Xcode -> Target -> Signing & Capabilities 에서 계정에 Push Notification 기능을 추가해 줍니다. 이 기능은 이미 애플 개발자 계정에 등록되어 있어야 합니다. 개발자 계정 등록과 분류에 대해서는 다른 포스팅에서 추가하도록 하겠습니다.
또한 클라이언트에서는 DeviceToken을 얻어서 서버 측에 전달해주어야 합니다. 디바이스토큰은 기기에서 유일한 것이며 APNS에서 해당 디바이스에 푸시토큰을 인식할 때 사용됩니다.
APNS과 통신하는 방식은 2가지 방식이 있는데 하나는 토큰기반 연결방식과 인증서기반 연결방식이 있습니다. 인증서기반은 토큰기반보다 보안을 강화한 연결방식이며 애플 개발자 계정에서 인증서를 발급받아야 합니다. 토큰 기반보다 복잡하지만 보안 연결에 치중한 연결방식입니다. 반면 토큰인증방식의 장점은 고정된 토큰을 기반으로 하기에 증명서가 쓰이지 않아서 같은 토큰으로 여러 서버(Provider Server)를 사용할 수 있습니다. 또한 여러 기기로 푸시를 분배할 수 있습니다.
보통 토큰 기반 연결을 사용하고 이번에는 저도 토큰 기반 연결을 사용할 예정입니다.
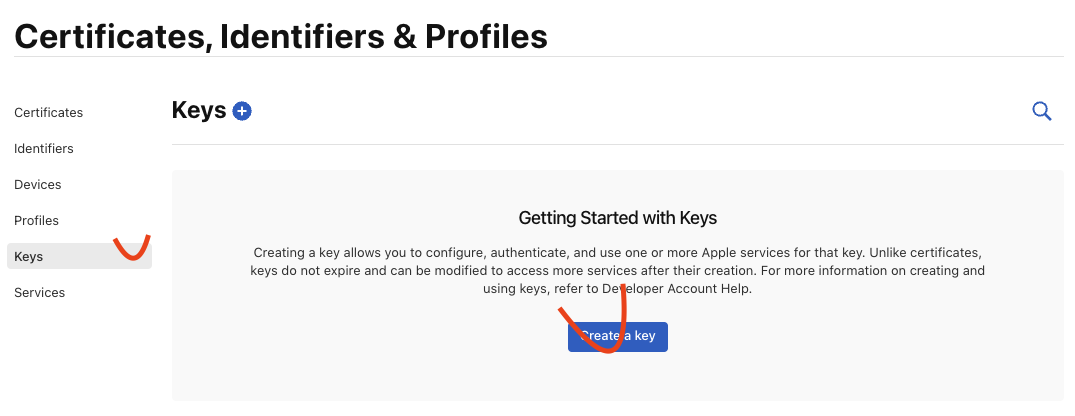

발급받은 APNs Key ID와 token signing Key는 Provider Server에서 항상 가지고 있어야 하고 한 번밖에 다운되지 않으므로 주의 깊게 다뤄야 합니다. 다시 다운로드하으려면 애플 개발자 사이트에서 다시 발급받아야 합니다. 다운로드 한 파일은 JWT형식인 JSON의 웹토큰 방식이며 키-값이 포함돼있는 형식입니다.
APNs에 푸시를 날리라는 요청을 할 때 POST방식으로 헤더에 JWT형식의 토큰을 포함하여 보내줍니다.
서버에서 보내야 될 정보는
- 내가 메시지에 표시될 정보 JSON payload에 표시
- 각 기기의 디바이스 유저토큰
- header에 명시될 notification을 뱃지, alert인지, background인지 표시될 방법 명시
- 방금 위에서 받은 보증된 APNs를 위한 키
보낼 APNs 연결 주소
- 개발용 : api.sandbox.push.apple.com:443
- 상용화: api.push.apple.com:443
여러 연결을 통해서 많은 푸시를 보내면 알아서 APNs에서 분산해서 처리합니다.
이렇게 전체적인 Push Notification 처리과정에 대해서 알아보았습니다. 대부분의 앱들은 푸시 서버를 따로 구성하기 때문에 Provider Server를 주로 사용할 것입니다. 하지만 간단하게 서버를 구성하려면 Firebase를 이용한 방법도 있으니 검색해 보시면 좋겠습니다.
2. Push Notification 사용법 - 서버
토큰 기반 연결을 설정하는 인증서를 p8파일, 인증서 기반 연결을 맡고 있는 파일을 p12파일입니다.
p8 파일의 특징은 하나의 토큰으로 여러 군데에서 사용할 수 있습니다. P12 파일은 인증서기반 방식으로 1년이 유효기간이며 이 기간이 지나면 갱신해주어야하는 번거로움이 있습니다.
애플에서는 토큰 방식인 p8 , 인증서 기반 방식으로 권장합니다. 저는 provider server를 파이어베이스가 아닌 Java로 실행할 것이기 때문에 pushy라는 apns를 쉽게 만들어주는 라이브러리를 사용하겠습니다.
https://github.com/jchambers/pushy
GitHub - jchambers/pushy: A Java library for sending APNs (iOS/macOS/Safari) push notifications
A Java library for sending APNs (iOS/macOS/Safari) push notifications - GitHub - jchambers/pushy: A Java library for sending APNs (iOS/macOS/Safari) push notifications
github.com
Maven 으로 다운로드할 수도 있고 라이브러리로 다운로드하여서 추가해도 상관없습니다.
pushy의 경우 p12 인증서와 p8 인증서 모두 사용가능합니다. p12 인증서의 경우 파일과 인증서를 받았을 때 설정했던 비밀번호가 필요하며 p8의 경우에는 파일과 ID가 필요합니다.
final ApnsClient apnsClient = new ApnsClientBuilder()
        .setApnsServer(ApnsClientBuilder.DEVELOPMENT_APNS_HOST)
        .setClientCredentials(new File("/path/to/certificate.p12"), "p12-file-password")
        .build();


final ApnsClient apnsClient = new ApnsClientBuilder()
        .setApnsServer(ApnsClientBuilder.DEVELOPMENT_APNS_HOST)
        .setSigningKey(ApnsSigningKey.loadFromPkcs8File(new File("/path/to/key.p8"),
                "TEAMID1234", "KEYID67890"))
        .build();
위에서 언급했던 Device Token과 원하는 메시지를 표시할 payload를 담아주고 푸시를 날려주면 됩니다. DeviceToken은 로그인할 때 넘겨줘서 데이터베이스에 넣어줍니다.
final SimpleApnsPushNotification pushNotification;

{
    final ApnsPayloadBuilder payloadBuilder = new SimpleApnsPayloadBuilder();
    payloadBuilder.setAlertBody("Example!");

    final String payload = payloadBuilder.build();
    final String token = TokenUtil.sanitizeTokenString("<efc7492 bdbd8209>");

    pushNotification = new SimpleApnsPushNotification(token, "com.example.myApp", payload);
}
payload도 쉽게 넣어주는 것을 지원합니다. PushNotification을 만들기 위한 빌더를 구성합니다.
try {
    final PushNotificationResponse<SimpleApnsPushNotification> pushNotificationResponse =
            sendNotificationFuture.get();

    if (pushNotificationResponse.isAccepted()) {
        System.out.println("Push notification accepted by APNs gateway.");
    } else {
        System.out.println("Notification rejected by the APNs gateway: " +
                pushNotificationResponse.getRejectionReason());

        pushNotificationResponse.getTokenInvalidationTimestamp().ifPresent(timestamp -> {
            System.out.println("\t…and the token is invalid as of " + timestamp);
        });
    }
} catch (final ExecutionException e) {
    System.err.println("Failed to send push notification.");
    e.printStackTrace();
}
sendNotification 메소드를 통해 pushNotification을 감싸고 Push를 보내줍니다. 잘 전송되었는지 에러처리를 isAccepted()를 통해 확인하며 에러처리를 해줍니다.
{
   "aps" : {
      "alert" : {
         "title" : "Game Request",
         "subtitle" : "Five Card Draw",
         "body" : "Bob wants to play poker"
      },
      "category" : "GAME_INVITATION"
   },
   "gameID" : "12345678"
}
Apple Developer Documentation
developer.apple.com
Push Notification 양식은 위의 사이트를 참고해 주세요. POST로 JWT 형식으로 보내야 합니다.
3. Push Notification 사용법 - 클라이언트
처음 DeviceToken을 얻기 위해서 AppDelegate.swift 파일에서 didRegisterForRemoteNotificationWithDeviceToken 오버라이딩 함수를 통해서 Device토큰을 얻습니다.
 func application(_ application: UIApplication, didRegisterForRemoteNotificationsWithDeviceToken deviceToken: Data) {

        // Convert token to string
        let deviceTokenString = deviceToken.reduce("", {$0 + String(format: "%02X", $1)})

        // Print it to console
        print("APNs device token: \(deviceTokenString)")
        MyInfo.sharedInstance.pushKey = deviceTokenString
    }
이렇게 나온 DeviceToken을 통신을 하든 데이터베이스에 하드코딩하든 집어넣어서 어떤 기기에 푸시를 보낼지 정해줘야 합니다.
func application(_ application: UIApplication,
           didFinishLaunchingWithOptions launchOptions:
           [UIApplicationLaunchOptionsKey: Any]?) -> Bool {
   // Override point for customization after application launch.you’re
   UIApplication.shared.registerForRemoteNotifications()
   return true
}

func application(_ application: UIApplication,
            didRegisterForRemoteNotificationsWithDeviceToken
                deviceToken: Data) {
   self.sendDeviceTokenToServer(data: deviceToken)
}
다음으로 푸시를 위해 등록해줍니다.
 let center = UNUserNotificationCenter.current()
        center.delegate = self

        if let notification = launchOptions?[.remoteNotification] as? [String:AnyObject]{


            let key:String = notification["key"] as! String
            let type:String = notification["type"] as! String

            let dicuserInfo:[String:String] = ["P2" :key, "P1" : type]


            //let aps = notification["aps"] as! [String : AnyObject]
            MyInfo.sharedInstance.pushData = dicuserInfo
        }
푸시에 대한 처리를 해주기 위해 위의 didFinishLaunchingWithOptions에서 UNUserNotificationCenter.current()를 통해 notification을 받아와서 Payload를 처리합니다.
저 같은 경우에는 key와 type 을 받아서 그것에 맞게 처리하도록 Push를 만들었습니다. 이 값을 싱글톤 객체에 담아서 MainViewController에서 처리하였습니다.
스마트폰에서 보여질 메시지는 이미 서버에서 넣어두었고 푸시를 눌렀을 시에 처리할 일들을 각 키와 타입에 넣어서 처리하는 방식입니다. 예를 들어 카톡 메시지가 왔을 때 그것을 누르면 채팅방으로 들어가지듯이 채팅방으로 들어가는 명령어를 처리하게 해놓았습니다.
[함께 읽으면 좋은 글]
2023.01.25 - [취미로 코딩하기] - Docker, 도커를 사용하는 이유와 도커 설치법
Docker, 도커를 사용하는 이유와 도커 설치법
도커를 사용하면 서버환경 구성하기 편하다는 말을 조금씩 들어왔지만 제대로 공부하고 설치해본 적은 없었습니다. 그래서 이번에는 도커를 활용해 AZURE나 AWS서버를 구축하는 과정을 해보려했
commnetall.tistory.com
2023.01.11 - [취미로 코딩하기] - React vs Flutter 무엇을 써야 할까 ? - 개발자 언어, 앱 언어, 개발 외주, 로드맵
React vs Flutter 무엇을 써야 할까 ? - 개발자 언어, 앱 언어, 개발 외주, 로드맵
요즘 스타트업에서 자주쓰는 언어는 React와 Flutter입니다. React는 페이스북이 개발한 사용자 인터페이스를 만들기 위한 라이브러리입니다. Flutter는 구글이 만든 원코드베이스 모바일, 웹, 데스크
commnetall.tistory.com
'프로그래밍_' 카테고리의 다른 글
| IOS 개발 APNs 아이폰 테스트 (0) | 2023.01.28 |
|---|---|
| 자바스크립트 ES6 , CommonJS 문법, 모듈시스템 차이 (0) | 2023.01.26 |
| Docker, 도커를 사용하는 이유와 도커 설치법 (0) | 2023.01.25 |
| React vs Flutter 무엇을 써야 할까 ? - 개발자 언어, 앱 언어, 개발 외주, 로드맵 (0) | 2023.01.11 |
| 파이어베이스로 간단한 웹페이지 호스팅 해보기, firebase hosting (0) | 2022.12.03 |


댓글